Podcasting Essentials Part 2: Recording
Author: Eoghan Colgan @Eoghan_Colgan
25/4/18
Like I said in part one, I do not consider myself an expert. This is simply one of many many ways that podcasting can be done. But I figured it might be a reasonable starting point for people completely new to the game.
So here is my workflow:
RESEARCH
If you are doing interview-style podcasts then I find it helpful to be prepared in advance. Find out as much as you can about your guest and write down a list of questions that you would like to ask during the interview. If you have helpful colleagues then share it with them and get a list of ideas and collate them together. I then send this to the interviewee in advance. It gives them a chance to prepare and makes them less nervous about the interview. I do not ask for their answers before we meet.
But remember, this is just a framework around which to conduct the interview. You want to maintain an unscripted feel but preparation will definitely help you maximize the use of the short time you have with some guests.
Also give the interviewee a little bit of a background about your podcast: who your audience is and what your aims are. Give them a chance to ask questions. I think the less nervous they are then the better the interview will flow.
And don’t be too ambitious with your number of questions. The time will go by fairly quickly. If you are aiming for a certain length of podcast then stick to the important points. It can be a bit of a hassle afterwards having to cut down lots of great stuff to make it fit (though you can put them out in two parts or occasionally put out a longer podcast if you think it worthwhile).
Next up is to consider the best choice of location to conduct the interview. It can be quiet surprising when you start out how you suddenly become aware of noises that normally wouldn’t bother you, but that become bothersome, when you’re trying to capture a very clean sound. Remember background noises can sound great and atmospheric so they are not always a bad thing (e.g. interviews in coffee-shops or at conferences). I tend to go for a more studio-like interview with as little background noise as I can. I remember spending time going around various rooms in the hospital and being disappointed by the trolleys trundling along nearby or the air-con units in the room with a constant low hum. In the end the majority of my interviews are done in two places – either in my house or in the medical illustrations department in our hospital. They have a video production facility with a quiet room and they have been extremely supportive and helpful with our podcasts.
One important point is to try and record the best sound you possibly can during the interview. The editing software can help remove lots of unwanted sound afterwards but it isn’t perfect and a far greater use of time is ensuring you capture the cleanest sound you can right at the beginning.
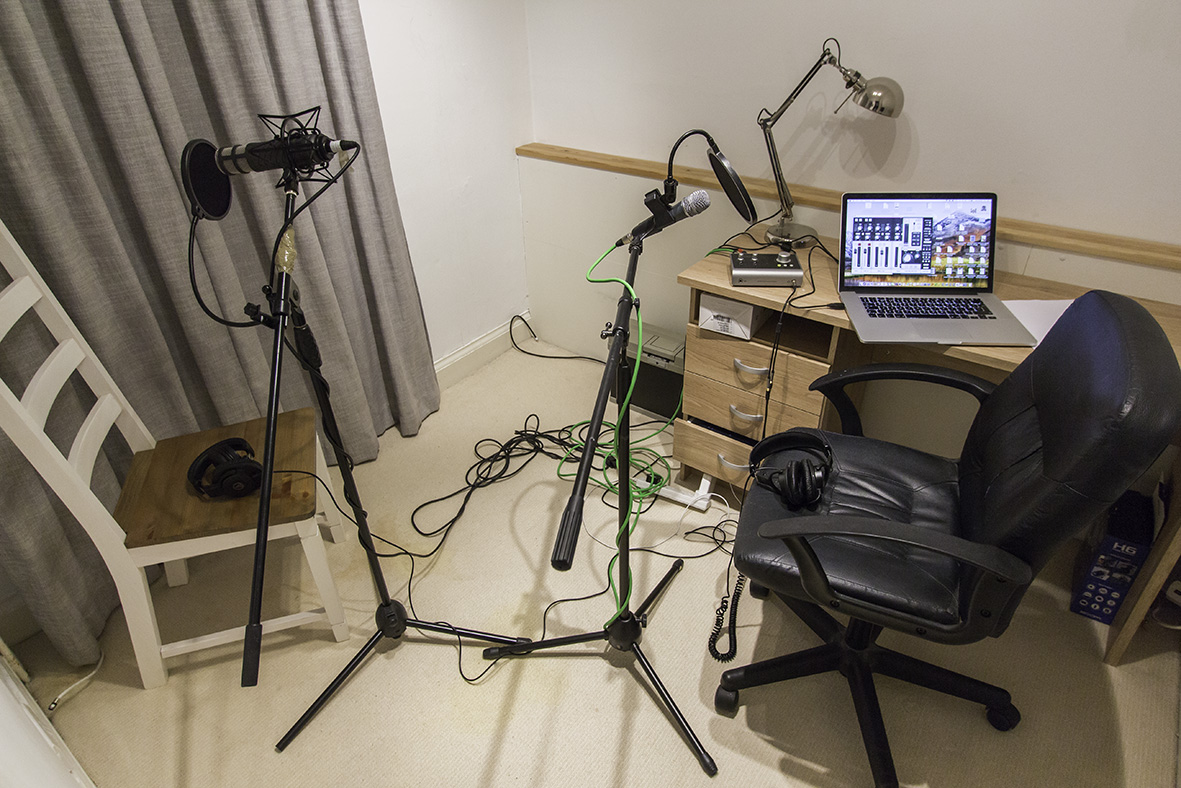
For me I think it helps to have a small space with carpets, and curtains if needed. This gives a ‘tight’ studio-like sound. Bigger more echoey rooms give a very different sound with lots of reverb which is impossible to remove after the recording. You will notice the difference between Podcast one (Randal McRoberts) and Podcast 10 (Jonathan Hanson). Both were recorded in my house but podcast one was recorded in a medium sized room with a wooden floor and no curtains. Podcast 10 was recorded in a small room with carpet and curtains (see image).
EQUIPMENT SET-UP
So I try as much as possible to be setup in advance of the interviewee arriving. It can take about 10mins of preparation time.
First up: open out your microphone stands and attach the microphones. You can see from the above image that the larger Rhode procaster mic has a shock mount while the smaller mic (shure beta 57a) has a standard mic clip.
Remember to give your interviewee the best microphone as they will be doing most of the talking.
Attach a mic cable to each microphone. You can wrap the cable around the mic stand if you wish to keep the room a bit tidier/neater. Then attach a pop shield to cover each microphone. Make sure you have two chairs in the room and position them approximately as you intend them to be during the interview.

Next up is to connect the microphones to your computer through your audio interface. I use the audient iD14 which has two mic inputs on the back of the machine as shown in the image. I typically connect my microphone into channel one and the interviewee into channel two.
Ensure that the phantom power switches are off (to the left) unless you are using condenser microphones which require additional power. Now connect the audio interface to the computer using the USB cable supplied with the interface. The USB will also provide power to the audio interface so you do not need to use the supplied power cable.
Then connect up your headphones. The audient iD14 only has one headphone input so you will need a splitter if you want headphones for both you and the interviewee.
Note: you will require headphones to keep a close check on the sound and listen out for any issues with the recording. The interviewee does not require headphones unless you are far away from each other or there is lots of ambient noise. I generally offer them the option and I find most people are happy to be interviewed without.
RECORDING SET-UP

Steinberg Hub Panel
Opening Cubase and preparing the tracks for recording
I will presume for this part of the blog that the software is already preloaded on your computer. The accompanying manuals will explain how to do this.

Empty Cubase project
Open Cubase software and you will first see the ‘Steinberg Hub panel’ where you can open old projects or create a new one. On the right-hand project bar choose “more”, then ‘empty’ then press ‘create empty’. This will bring you to a folder panel where you can choose where to save your new project. I have a podcast folder which contains individual folders for each project. So create a new folder and give it the name of the person you are interviewing (or something else of your choosing). Now press ‘open’. This will open an empty Cubase project which is currently untitled. Go to File>Save and then type in the name of the project you are creating (typically I use the name of the interview) – this creates a .cpr file and gives your project its title.

Project> Add Track>Audio...
Next: you need to create two tracks, one for each voice/microphone. (You will add additional tracks later for any additional music/sounds you wish to add to the podcast). Use mono tracks for voices and stereo tracks for music with stereo sound.
Go to Project>Add Track>Audio then when 'Add Audio Track' pane is opened (see image below) select two tracks with mono configuration and click ‘add track’.

Two tracks will now appear in Cubase titled: 'Audio 01' and 'Audio 02'.


Devices>Device Setup
Now you want to ensure that the microphones are connected appropriately to the computer (through the audio interface) with the correct mic paired with the right track.

Device Setup Panel
Firstly go to Devices>Device Setup. In the 'Device Setup' panel choose audient iD14 as the ASIO Driver (red arrow). Note the audience iD14 needs to be connected to the computer to appear in the dropdown menu. It will ask you if you want to switch the ASIO driver – press ‘switch’. Leave all the settings as they are.

Devices>VST Connections
Next: go to Devices>VST connections which will open the VST Connections panel (see below).

Add 2 new BUS inputs by clicking ‘Add Bus’ ..

...then select 2 counts and mono configuration:

You can rename each new Bus by double-clicking in the Bus Name column then typing the name of your choosing. Make sure the right name is given to the right device port. So as described before my microphone is in mic port 1 on the audio interface so my channel will have device port ‘Analogue 1’ and interviewee as ‘Analogue 2’. Audient iD14 should be the audio device for each BUS.

If this is a typical configuration for you then create a preset and give it a name. Then in future it’s easier to create the same configuration without adding the BUS’s as shown above. Click on the ‘+’ symbol just below the Inputs bar at top then type in a name and press ‘ok’. It will now appear in your ‘preset’s drop-down menu.
In the ouputs panel, the BUS name should be ‘Stereo Out’, the Audient iD14 should be the chosen audio device with Analogue 1 + 2 in the device port column.

Next is to ensure that each track is connected with the right BUS that you have just created. So highlight each track in turn as shown and the Inspector bar will appear to the left of the tracks. This inspector bar allows you to make a number of adjustments to that individual track (not required right now). Click on ‘Stereo in’ and choose the BUS that you have just created appropriate for the track. So if done like suggested then I would choose ‘Eoghan’ for my track and ‘Interviewee’ for the interview track.
We are now connected and ready to record with the right microphones connected with the right tracks. This can all be done in advance of the guest arriving. Next step is to sound-check and make sure the right levels and sound will be captured. This is best done with the guest present.
Sound-Check
Now that the equipment is set up you want to ensure that the sound is coming through and will be captured in your computer cleanly and at the right levels. If the volumes are too high then the sound will distort and if too low the quality won’t be as great. You want to get it somewhere in the middle.
When the audient iD14 is connected via the USB port it typically opens the audient control panel automatically and this is the screen that will appear. Don’t be put off - make sure all the settings are as displayed in the image (which I think are the standard settings).
Mic 1 channel is for the microphone connected to the mic one input (the interviewer microphone in this case)
Mic 2 channel is for the microphone connected to the mic two input (the interviewee microphone in this case)
DAW 1+2 is the sound returning from your computer back to the audio interface
· “S” = “Solo” button – this will only allow sound from this channel to be played through your headphones at that given moment (never used)
· “M” = “Mute” button – this silences that particular track in your headphones. You need to mute the ‘DAW 1+2’ channel when recording (otherwise you hear a distorted mix of sound going in and sound coming out at the same time) and then unmute it when you want to listen back.
· The fader allows you to adjust the sound in the headphones of each particular track (note this does not adjust the level of sound being recorded) – again I never use
· The sound meter allows you to see the level of the signal coming in to that particular track. This is important.
First important thing to do is a ‘sound check’ to ensure the right levels are being captured. Ask the interviewee to speak in their normal talking voice into the microphone. Ideally get them to within 5-6 inches from the microphone (with the pop shield between them and mic). This means you can turn down the gain and the mic becomes less sensitive so shouldn’t capture so many background noises. If they sit too far away from the mic then you have to turn the mic gain up which will capture more ambient sounds. I think a warmer, cleaner sound is when they get into the right range (about 5-6 inches). Too close and you might capture a bit too much unwanted breathe sounds, slurping sounds, plosives etc.
Note: also ask the interviewee to maintain a consistent distance from the mic during the interview. It’s very easy for them to drift backwards away from the mic during the interview or for their head to drift to the side as they try to maintain your gaze. This will lead to changes in the sound quality and volume, which can be corrected, but it is best to be consistent.
To hear in your headphones, press the microphone button on the audient iD14 interface and turn the large control knob clockwise until the volume is satisfactory in your headphones. You will notice as you do this that the microphone controller on the audient iD14 system panel will go up. The 3 o’clock position is probably about right. This controller adjusts the volume of both microphones at once. You can make adjustments to the volume of each microphone independently by using the faders on the microphone input channels (I never do this).
So as they are speaking you can adjust the gain button on your audient iD14 until the sound meter is showing all of the green bars lit and 2-3 yellow bars. You want to avoid any red. Also useful to ask them to make a louder sound like a laugh or cough to make sure no red appears. Now repeat for your microphone.
At this stage you want to ensure that the sound is coming in clean and you are not detecting any background noise or additional sounds from badly connected cables etc.
So now we have a clean sound at the right levels coming into the computer and we are ready to record:
Recording
Best to do a quick test record first of all:
Ensure both tracks have the ‘Record enable’ and ‘Monitor’ buttons highlighted as shown. This means the tracks are ready to start recording. You will also need to ensure that the ‘DAW 1+2’ channel is muted on the audient control panel, and the two microphone channels are unmuted.
Press the record button on the Cubase panel and you will see a recording start to appear on the screen. A vertical ‘transport line’ scrolls from left to right with the sound waves generated ‘behind’ it. . As both people speak you should see wave forms in the corresponding tracks that indicate the signal is coming through and the recording is being made. The wave forms should be clearly visible but not too big. To stop the test recording either press the ‘spacebar’ key or press the ‘Transport stop’ button. To listen back, unclick the ‘monitor’ button (orange) on each track and unmute the ‘DAW 1+2’ channel on the audient iD14 control panel. Then bring the transport line back to the beginning either by:
· clicking and dragging the timeline bar just above track one or
o if you hover the cursor on the lower half of the time line bar a symbol appears with 4 arrows pointing north/south/east/west
o If you click and drag here the transport line can be moved to a point of your choosing
· by pressing the ‘<’ button which is a shortcut to return the transport line to the very start of the track.
Press spacebar to play or the ‘transport play button’. You should hear both tracks. This is a final chance to ensure the sound is clean with no added, unwanted sounds.
You are now ready to proceed to make the formal recording. I generally delete the two test tracks by selecting the recorded track (click the cursor on the track and it becomes highlighted in black). Then press the ‘delete’ button to delete it. You can select multiple tracks at once by holding the ‘cmd’ key on a mac whilst selecting the tracks.
Remember to prime the tracks again for recording:
· Ensure ‘record enable’ and ‘monitor’ buttons are primed on each track
· Ensure on the audient iD14 control panel that the mic channels are unmuted and the DAW 1+2 channel is muted.
Before I begin I usually remind the guest of a few important points:
· There is absolutely no pressure when recording – if they don’t like what they are saying then they can stop and redo it. We can edit out the flaws/mistakes afterwards.
· If they need to pause for a drink etc then that is absolutely fine.
· Keep a constant distance from the microphone
· Avoid any unwanted sounds such as banging the mic stand or rustling papers (quite obvious with sensitive mics).
· Turn off any mobile phones and also turn off the wifi connection on your computer
Press record again and we’re off.
In the next part we will discuss how to edit the recording.